


10 Farmhouse Woodworking Projects to Warm Up Your Home
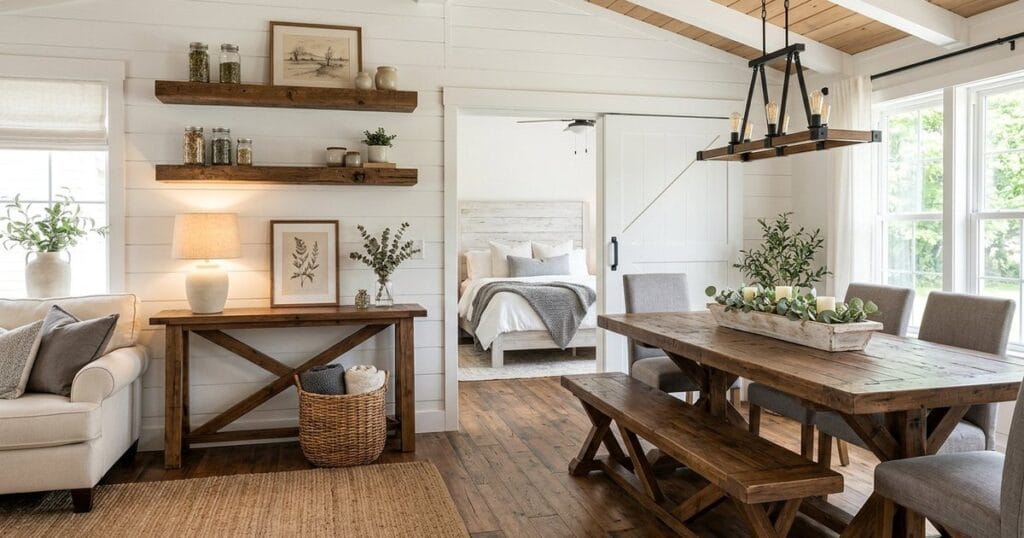
Farmhouse style has staying power for a reason: it’s warm, forgiving, and built on honest materials that look better with a little wear. The same qualities that make it cozy also make it perfect for woodworking — simple joinery, straight cuts, and finishes that reward imperfection. Whether your home leans modern farmhouse, cottage, or full-on rustic, these 10 farmhouse woodworking projects add that collected, lived-in warmth to every room. You’ll find quick weekend wins like floating shelves and lazy Susans alongside slightly bigger builds like benches and barn doors, all achievable with basic tools and lumber-yard boards. Each project includes difficulty, time, and materials so you can pick the one that fits your Saturday. Ready to add some shiplap-adjacent charm to your home? Let’s get into the sawdust.
1. Farmhouse Console Table
Every entryway deserves a console table, and the X-brace design is the farmhouse icon. The frame is genuinely beginner-friendly: four legs, aprons joined with pocket screws, a slatted lower shelf, and diagonal boards forming those signature X sides. Build it from 4×4 legs and 1x boards for about $60, compared to $400 in stores. Sand the top extra smooth and finish with a dark walnut stain or a weathered gray wash. Style it with a lamp, a woven basket underneath, and a small plant, and your entry instantly looks designed. At about 48 inches long it fits most walls, but measure your space and scale the length before cutting.
- Difficulty: Beginner to intermediate
- Time to build: One weekend
- Materials: 4×4 for legs, 1×4 aprons and 1×6 top boards, 1×2 X-brace slats, pocket hole jig and screws, wood glue, sandpaper, stain, clear poly


Alt text: “Farmhouse X-brace console table, classic farmhouse woodworking project for the entryway.”
The Ted’s Woodworking plans furniture library has console table cut lists in three sizes — helpful if your wall needs a custom length.
2. Rustic Floating Shelves
Floating shelves are the fastest farmhouse upgrade in the kitchen, bathroom, or coffee nook. The sturdy method is a hollow box construction: a 2×2 cleat screwed into studs, with a hollow shelf shell of 1x boards that slides over it. Thick looks matter here — 2.5 to 3 inches of visible depth reads generously farmhouse. Stain them warm oak, mocha, or classic walnut and keep the grain visible. Two shelves stacked 14 to 16 inches apart perfectly frame mugs, jars, and a trailing pothos. The whole build takes about two hours plus finish, and once you’ve made one you’ll find excuses to put them everywhere.
- Difficulty: Beginner
- Time to build: About 2 hours, plus stain drying
- Materials: 1×6 and 1×4 boards for shelf shells, 2×2 cleats, wood glue, brad nails, stud finder, level, 3-inch screws, stain, polyurethane

Alt text: “Rustic floating shelves, easy farmhouse wood project for kitchen walls.”
3. Farmhouse Dining Bench
A chunky bench beside the dining table is peak farmhouse practicality — it seats more people, tucks under the table, and handles kids better than chairs. The classic build is a 2×8 or 2×10 top on two A-frame or T-legs joined with screws and glue; the even easier version uses hairpin legs on a stained top for farmhouse-modern fusion. Round the front edges generously with a sander so knees forgive you daily. Finish with multiple coats of wipe-on poly since this surface sees elbows, spills, and homework. At 14 inches wide and table height (about 18 inches tall), it’s comfortable by design, and you can build it in one Saturday afternoon.
- Difficulty: Beginner
- Time to build: About 3 hours, plus finish coats
- Materials: 2×8 or 2×10 top board, 2×4 material for leg frames or purchased hairpin legs, wood screws, glue, sandpaper, stain, wipe-on polyurethane

Alt text: “Farmhouse dining bench, sturdy and simple farmhouse woodworking project for family meals.”
4. Mini Sliding Barn Door
A full barn door is a big commitment, but a mini barn door for a pantry, cabinet, or TV console delivers the same charm in a weekend. Build the door as a simple frame-and-panel or Z-brace design sized to your opening, paint it matte white or stain it espresso, and mount it on a short barndoor hardware track above the cabinet. The rolling action alone makes guests smile. Measure the opening first and size the door about an inch wider per side for proper coverage. Use a track rated for the door’s weight, and rubber stops keep the roll quiet. It’s the single most-complimented upgrade most farmhouse DIYers make.
- Difficulty: Intermediate
- Time to build: One weekend
- Materials: 1×6 and 1×4 boards for door, wood glue, brad nails, mini barn door hardware kit, 2×4 header board for track mounting, paint or stain, level, stud finder

Alt text: “Mini sliding barn door with Z-brace, charming farmhouse furniture DIY upgrade.”
5. Farmhouse Trough Centerpiece
The humble wooden trough is the Swiss Army knife of farmhouse tables. Build a simple long box from 1×6 boards with butt joints, add small end handles by drilling finger holes, and finish with a whitewash that lets the grain whisper through. Fill it seasonally — candles and greenery in winter, tulips in spring, pumpkins in fall — and your table is decorated year-round with one move. At about 24 to 30 inches long it fits most dining tables without blocking conversation. This is also one of the easiest projects on this list to batch for gifts; two boards make two troughs, and everyone who visits asks where it came from.
- Difficulty: Beginner
- Time to build: About 1.5 hours, plus finish
- Materials: 1×6 and 1×4 boards, wood glue, brad nails, drill with hole saw for handles, sandpaper, whitewash or stain, felt pads

Alt text: “Farmhouse trough centerpiece box, versatile DIY farmhouse decor for the dining table.”
6. Farmhouse Coffee Bar Shelf
A dedicated coffee bar turns the morning shuffle into a small daily pleasure, and the wooden version is beautifully simple: one board, two corbels. Cut a 1×10 to about 30 inches, mount it on store-bought or shop-built corbels above your counter, and finish with a food-safe seal since splashes are guaranteed. Style it with the machine, a mug rack below, and jars of beans and sugar. Corbels from the lumber aisle are cheap, but building your own from 2×6 cutoffs with a jigsaw curve is a satisfying skill-builder. Either way, anchoring into studs matters — a full mug shelf is heavier than it looks.
- Difficulty: Beginner
- Time to build: About 1.5 hours
- Materials: 1×10 shelf board, two corbels (purchased or cut from 2×6), wood screws into studs, sandpaper, stain, food-safe sealer, level

Alt text: “Farmhouse coffee bar shelf with corbels, cozy farmhouse woodworking project for kitchens.”
7. X-Brace Side Table
The little sibling of the console table, the X-brace side table lives beside sofas and beds with equal grace. Four 2×2 legs, a simple apron frame, a 2x top, and the diagonal X on one or both ends — that’s the whole anatomy. At about 15 by 20 inches it’s an afternoon build that teaches real furniture structure: square legs, a flat top, joinery that doesn’t wobble. Stain the top two shades darker than the legs for contrast, or paint the base white with a natural top for the quintessential farmhouse two-tone. Level the feet carefully — floor-friendly felt pads forgive any remaining wobble and protect your finishes.
- Difficulty: Beginner to intermediate
- Time to build: About 3 to 4 hours
- Materials: 2×2 legs, 1×4 apron and slats, 1×6 top boards, pocket screws or dowels, wood glue, sandpaper, stain and paint, felt pads

Alt text: “X-brace side table in farmhouse two-tone finish, beginner farmhouse furniture DIY.”
8. Farmhouse Picture Ledge
If your photos and art keep rotating between walls and shelves, the picture ledge is the elegant permanent fix. Three boards — a back, a bottom, and a small front lip — screwed into a sleek 4-inch-deep ledge, mounted at eye level along a hallway or above a sofa. Frames lean, swap, and layer without a single nail hole per picture, which is exactly why designers love them. A subtle groove routed along the bottom keeps thin frames from sliding forward. Finish in the same white as your trim for a built-in look, or stain warm wood tones for contrast. Make two or three identical ledges and stack a gallery wall in one afternoon.
- Difficulty: Beginner
- Time to build: About 1 hour per ledge
- Materials: 1×4 and 1×2 boards, wood glue, brad nails, optional router for frame groove, 3-inch screws into studs, level, paint or stain

Alt text: “Farmhouse picture ledge for leaning frames, practical rustic farmhouse woodworking project.”
9. Wooden Lazy Susan
A gorgeous round lazy Susan is a turning-free project: no lathe needed. Glue up a panel of 1×8 boards into a panel, cut an 18-inch circle with a jigsaw using a simple nail-and-string compass, and sand the edges round. A purchased lazy Susan bearing screwed underneath provides the spin for under $8. Stain it walnut and burn or stencil a simple ring detail near the edge — or leave it pure wood with a food-safe oil finish. It corrals oils and spices by the stove, serves appetizers at parties, and makes a stunning centerpiece base. Handmade versions sell for $50-plus in boutiques; yours costs about $12.
- Difficulty: Beginner
- Time to build: About 2 hours, plus glue and finish drying
- Materials: 1×8 boards for glue-up, wood glue, clamps, jigsaw, lazy Susan bearing, sandpaper, food-safe oil and wax

Alt text: “Wooden lazy Susan turntable, easy farmhouse woodworking project for the kitchen.”
10. Farmhouse Plank Headboard
The headboard is the biggest farmhouse statement a bedroom can make, and it’s essentially a wide console table top turned vertical — no complicated construction at all. Join five or six 1×6 or 1×8 boards edge-to-edge with pocket screws and glue on a backer frame, sand, and finish in whitewash, weathered gray, or classic stain. Higher boards with a simple crown cap rail look especially architectural. Mount it to the wall with a French cleat or bolt it to your bed frame — the cleat makes future moves painless. Queen size runs about 62 inches wide; add 2 to 4 inches total past your mattress width for the balanced look.
- Difficulty: Beginner to intermediate
- Time to build: One weekend
- Materials: 1×6 or 1×8 boards, 1×4 backer and cap rail, pocket hole jig and screws, wood glue, sandpaper, whitewash or stain, French cleat, clear sealer

Alt text: “Farmhouse plank headboard, statement rustic farmhouse woodworking project for the bedroom.”
The Ted’s Woodworking plans bedroom section includes headboard dimensions for twin through king, with optional built-in sconce mounting.
Conclusion
Farmhouse style rewards the hands-on maker: simple boards, honest finishes, and builds meant to be lived with, not looked at from a distance. These 10 farmhouse woodworking projects cover every room from entryway to bedroom, and every one adds both function and that warm, collected-over-time character shops can’t fake. Start with something small like the trough or ledge to warm up your skills, then take on the console or headboard for a weekend that transforms a whole room. For cut lists, joinery diagrams, and hundreds more farmhouse plans, explore the Ted’s Woodworking plans collection — and subscribe to the Home Decor Woodworking newsletter for new project ideas delivered every week. Happy building, and enjoy your warmer, woodier home!
Affiliate Disclosure: This post contains affiliate links. If you purchase through these links, we may earn a small commission at no extra cost to you. We only recommend products we trust and believe will benefit our readers.